Templates are my starting point for any kind of document or presentation. The templates in Google Slides have become more visually appealing but I really want my audience to drawn to the content of my slides. I was introduced to Slides Carnival at a Google Summit and it has changed my life.
Slides Carnival has a variety of free templates to use that are visually appealing and are easy to edit. Head over to www.slidescarnival.com, choose a template and make a copy for yourself. That's it! Start editing it to include the information you want it to have. The one requirement is that you keep the credit slide at the end. Head over to Slides Carnival and start spicing up your presentations.
This blog is meant to get out varying information from the Lit-Techs to the staff at LHS. This can vary from literacy and technology tips, news or announcements.
Showing posts with label Google Drive. Show all posts
Thursday, April 28, 2016
Monday, November 17, 2014
MWGS Presentation - Using g(Math)
I had the great opportunity to present at the Midwest Google Summit this morning and what a great experience it has been. My presentation is below and the feedback from the audience has been so positive and encouraging. Thank you to everyone that had the chance to see it. If you have any questions or would like access to anything please feel free to email me.
Tuesday, May 20, 2014
Google Sheets App: New Options
While using the new Google Sheets app I noticed a few additional tools that I do not remember being in the original Google Drive app. If you click the header of a row or column it pulls up these new options.
1) Insert Rows/Columns: You now have the option to insert a row/column before or after your selection.
2) Delete Rows/Columns: You can not delete a row/column from the app. I do not remember that being an option.
3) Sort: You can sort A->Z or Z->A from within the Sheets app.
All of these options may have been available in the Google Drive app but they are new to me.
1) Insert Rows/Columns: You now have the option to insert a row/column before or after your selection.
2) Delete Rows/Columns: You can not delete a row/column from the app. I do not remember that being an option.
3) Sort: You can sort A->Z or Z->A from within the Sheets app.
All of these options may have been available in the Google Drive app but they are new to me.
Wednesday, May 14, 2014
Google Drive App for iPhone: Easiest Way to Display Student Work
1) Download, open and link the Google Drive app to your Google account. I use my personal iPhone because the iPad I have from my school is an iPad 2 whose camera is horrible.
2) While in the Google Drive app click the plus sign (+) in the top right corner.
3) In the menu it brings up, choose "Use Camera" at the bottom.
4) Take a picture of your students work and click "Use Photo." If you do not like the photo you can choose "Retake" instead.
5) After you take the photo the app will automatically upload the photo to your Google Drive account. It will put it in your main Drive folder. To see the progress of the upload, open the menu and click "Uploads." It usually takes about 30 seconds to upload the file.
6) In Chrome open the picture file in your Drive account and show the class their work. If you have a hard time finding the file (it usually names it "Photo Date Time") open your recent items and it should be at the top of your list.
Monday, May 12, 2014
Sharing Notes Made Easier: Embedding a Shared Folder
I like for my students have have access to everything we do in class. From filled out notes to group videos we create in class, giving my students access to everything they need to be successful has gotten a lot easier with the ability to embed a Google shared folder on my web page.
Here is how I take advantage of this tool.
1) Create a folder in your Google Drive that is available for all students. Make this folder shared so "Anyone With a Link Can View."
2) On your Google Site, find a place to embed the folder. To do this click the Edit (Pencil) button (top right corner, if you do not see the pencil scroll to the bottom of the webpage and click "Sign In")
3) Under "Insert" choose Google Drive and click Folder.
4) Choose the folder that you created for your class. I have so many folders in my Drive that it is easier for me to just grab the URL to the folder and paste it. There many options such as the size of your folder and the way it is displayed. The default settings should be fine. Click Save.
Now anytime you add anything to that folder in your Drive the embedded folder on your website will also update too.
Here is how I take advantage of this tool.
1) Create a folder in your Google Drive that is available for all students. Make this folder shared so "Anyone With a Link Can View."
2) On your Google Site, find a place to embed the folder. To do this click the Edit (Pencil) button (top right corner, if you do not see the pencil scroll to the bottom of the webpage and click "Sign In")
3) Under "Insert" choose Google Drive and click Folder.
4) Choose the folder that you created for your class. I have so many folders in my Drive that it is easier for me to just grab the URL to the folder and paste it. There many options such as the size of your folder and the way it is displayed. The default settings should be fine. Click Save.
Now anytime you add anything to that folder in your Drive the embedded folder on your website will also update too.
Friday, May 9, 2014
Organize Your Drive Folders with Color
Just like with Google Calendar you can associate a color to your Google Drive folders. This makes it easy to find the folder you are looking for instead of just seeing the bland gray folders.
It is very easy to associate a color to a folder. Hover over the folder you want to change and click the "Down Arrow" that pops up to the right of the folder name. Choose "Change color" and choose a color. You can also add colors to sub folders as well!
Wednesday, April 30, 2014
Google Drive Shared Folders: Making Annotated Notes Easy to Share
When I first started teaching one of the hardest things to do was to get students that were absent material, such as annotated notes from class, before coming back to class. With the use of Google Drive and sharing my folders I have a 3 step daily routine that keeps all of my classroom material up to date on my website. A must-have is to embed your class shared folder onto your website! It updates automatically when you add something to it.
1) Create a note sheet and save it as a pdf to my class shared folder.
2) While in class I use Smart Notebook or my iPad to annotate on the notes
3) Post the notes to my shared Drive folder.

Now in my class folder I have a blank copy of the notes and an annotated copy. This has been such a time saver and it has allowed my students to not fall behind while not in class.
1) Create a note sheet and save it as a pdf to my class shared folder.
2) While in class I use Smart Notebook or my iPad to annotate on the notes
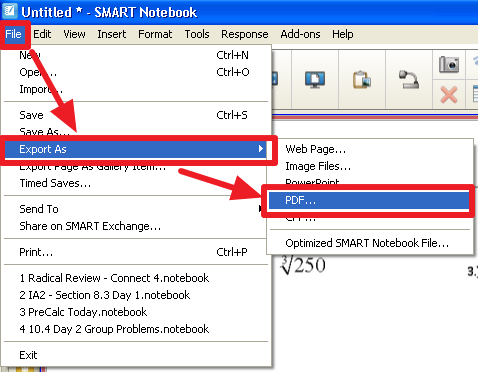
- Smart Notebook: I "print" my note sheet to Smart Notebook via the Smart Notebook Print Capture, and then annotate on the notes throughout class.
- iPad: For using my iPad in class I use the program Good Notes. Good Notes allows you to annotate over a pdf on your iPad. Good Notes also allows you to link your Google Drive account to it. I pull up the non-annotated pdf version of my notes from my Drive and project my iPad's screen through the projector in my room by using Reflector. This is extremely helpful because it lets me circulate the room while I annotate on the iPad and take pictures of student work as they complete problems.
3) Post the notes to my shared Drive folder.
- Smart Notebook: I then export the notes as a pdf. If you have Google Drive installed on the computer you can export this pdf straight to your class shared folder.

- iPad: The best part of Good Notes is that it will let you export your annotated notes right back to your Google Drive class folder.
Now in my class folder I have a blank copy of the notes and an annotated copy. This has been such a time saver and it has allowed my students to not fall behind while not in class.
Tuesday, April 29, 2014
QR Codes: An Integral Part of My Classroom
QR codes were introduced to me at the Midwest Google Summit this past November. Since then their integration in to my classroom has changed the way I have students access material in my Google Drive. I use the goo.gl shortener extension (link to chrome webstore) to create QR codes to different URLs I want my students to go to.
I wanted to share the THREE main ways I use QR codes in my class
1) QR Codes to My Flipped Classroom Google Forms.
For flipping my class, I supply my students with a guided note sheet to complete with the video. Before QR codes the students had to navigate to my website, but now they can scan the QR code on the notes and it will bring them right to the Google Form with the video and questions.
2) QR Codes to Answer Keys for Homework.
I like for my students to have access to the answer keys while they complete their homework to check their work. However many students did not want to take the time to navigate to my webpage to find the keys. Instead I create a QR code and put that on their homework so when they are done they can scan the code and check their answers right away.
3) QR Code For a Bell Ringer
As soon as the students walk in the door to my classroom I want them to be engaged so I have them fill out a Google Form several times a week to see what they thought of the homework. Instead of giving them a URL, I project a QR Code linked to a Google Form on the front board. They then scan the QR code and they have a few minutes to complete it while I check their homework. I find that this is a great time for me to check their homework instead of wasting time during class to do it. It also gives us a chance to look at the responses and discuss them as a class.
1) QR Codes to My Flipped Classroom Google Forms.
For flipping my class, I supply my students with a guided note sheet to complete with the video. Before QR codes the students had to navigate to my website, but now they can scan the QR code on the notes and it will bring them right to the Google Form with the video and questions.
2) QR Codes to Answer Keys for Homework.
I like for my students to have access to the answer keys while they complete their homework to check their work. However many students did not want to take the time to navigate to my webpage to find the keys. Instead I create a QR code and put that on their homework so when they are done they can scan the code and check their answers right away.
3) QR Code For a Bell Ringer
As soon as the students walk in the door to my classroom I want them to be engaged so I have them fill out a Google Form several times a week to see what they thought of the homework. Instead of giving them a URL, I project a QR Code linked to a Google Form on the front board. They then scan the QR code and they have a few minutes to complete it while I check their homework. I find that this is a great time for me to check their homework instead of wasting time during class to do it. It also gives us a chance to look at the responses and discuss them as a class.
Friday, April 25, 2014
Search Google Drive By File Type
Sometimes I find the need to look at every form I have created. Instead of going through all of my folders in my Drive there is an easier way to pull up a specific file type. Click the downward facing arrow in the search box while in your Drive and it will bring up a list of file types. Click the file type you want to search for and Drive will pull up every file that matches that criteria.
This is also helpful for searching for a file by specific file types by name.
Don't Forget to Install Google Drive Onto Your Computer
It took 6 months of using Google Drive for someone to tell me that you can install the application onto your PC or Mac for quicker access to your Drive folders. Installing the Google Drive application actually puts Drive into your list of drives as if it is one of your network drives.
Here are some of the benefits of using this as a way to manage your Drive files:
- You can share files right from the finder window by right clicking a file
- You can save a file directly to drive from a program (such as Word)
- If you open a Word document from your Drive window, edit it and then save it the file will be automatically updated in your Google Drive. It will also keep a record of revisions to that document if you right click the file from WEB version of Drive.
- Export annotated notes from Smart Notebook as a pdf straight to Drive for students
Wednesday, April 23, 2014
The Untapped Potential of Web Clipboard in Google Drive
Copy and paste is a necessity in creating resources for teaching. After using copy and paste within Google Drive some things did not paste correctly (especially pasting Google Drawings into a Google Document).
Web Clipboard however is a great tool within Google Drive applications where you can copy an item to a "web clipboard" and access that clipboard from any Google Drive application. Look at the result of copying the same "entire drawing" to the web clipboard and pasting it into a Google Document.
The drawing retains it all of its original traits and is a resizable image. There are other advantages to using the Web Clipboard as well. The Web Clipboard will hold up to 10 items for 30 days. That means you can access the same items from the same place without having to copy the item multiple times. The Web Clipboard is located under the "Edit" menu in every Google Application.
Thursday, April 17, 2014
Saving Files in Multiple Locations in Google Drive
Trying to locate a file in Google Drive can be frustrating if the location of the file is under several subfolders. Moving the file to a more accessible location would make finding it easier but maybe you would like it to also remain in its current location (maybe it is in a shared folder and you do not want it to loose it's shared properties). Well I just found this out.
You can move a file in Google Drive so it appears in multiple locations. When you select "Move to" hold down Control (⌘ on Macs) and click the second (or third or fourth) location you would like for the file to appear.
When you edit the file in one location it it also edited in all of the locations of the file.
Monday, April 14, 2014
Randomize Answers in Google Forms
A new to addition Google Forms this weekend allows you to shuffle the answer order for certain types of questions. (Multiple Choice, Checkboxes, Choose From a List and Grid)
This is a feature that can be used when using a Google Forms as an assessment tool as well as administering surveys to get a better idea of interest on a topic. And it is so easy to turn on, just check the box and the form will generate a randomized order of answers.
Thursday, March 20, 2014
Notes On Google Drive
When I have my students take notes I also put them (as a pdf) in a Google Drive folder that is shared with them. That way they have access to the notes even if they are absent. I created a folder in Google Drive that I shared with the class. That way when I put notes in that folder the students automatically have access to them (via my classroom website or from "Shared with Me" in their Google Drive account.
Subscribe to:
Posts (Atom)