
Showing posts with label Time Saver. Show all posts
Showing posts with label Time Saver. Show all posts
Monday, May 2, 2016
Quick Chrome Account Switching
Ever since I learned how to be signed into multiple accounts in Chrome, I have become more productive and faster at jumping between my multiple accounts. However, I've have found that switching accounts from the user screen takes more clicks than it should. That was until one of my colleagues showed me how to quickly switch between accounts. What was the secret? Right click your account name instead of left click. That easy!


Tuesday, April 26, 2016
Use SMART Ink Document Viewer Instead of Adobe Reader
As a SMART Board user for many years I've always used SMART Notebook for annotating notes. However, there are times I want to pull up a PDF file quickly such as a worksheet or an answer key and don't want to wait for the document to pull up in Notebook. In the past I would just open the document in Adobe Reader and annotate it there. But the annotations would not stay with the document because it was adding the annotations as a Ink Layer and you had to clear the ink before moving on. There had to be a better way!
That's where SMART Ink Document Viewer comes in. It is a PDF viewer but it works with SMART Ink so that the annotations stay with the text. Write on the document all you want and scroll away and the annotations will stay! You can also save the annotations to the PDF for reference later.
So the next time you go to open a PDF, choose "Open With" and choose SMART Ink Document Viewer.

That's where SMART Ink Document Viewer comes in. It is a PDF viewer but it works with SMART Ink so that the annotations stay with the text. Write on the document all you want and scroll away and the annotations will stay! You can also save the annotations to the PDF for reference later.
So the next time you go to open a PDF, choose "Open With" and choose SMART Ink Document Viewer.
Wednesday, April 20, 2016
Startup Your Frequent Tabs with Bookmark Folders
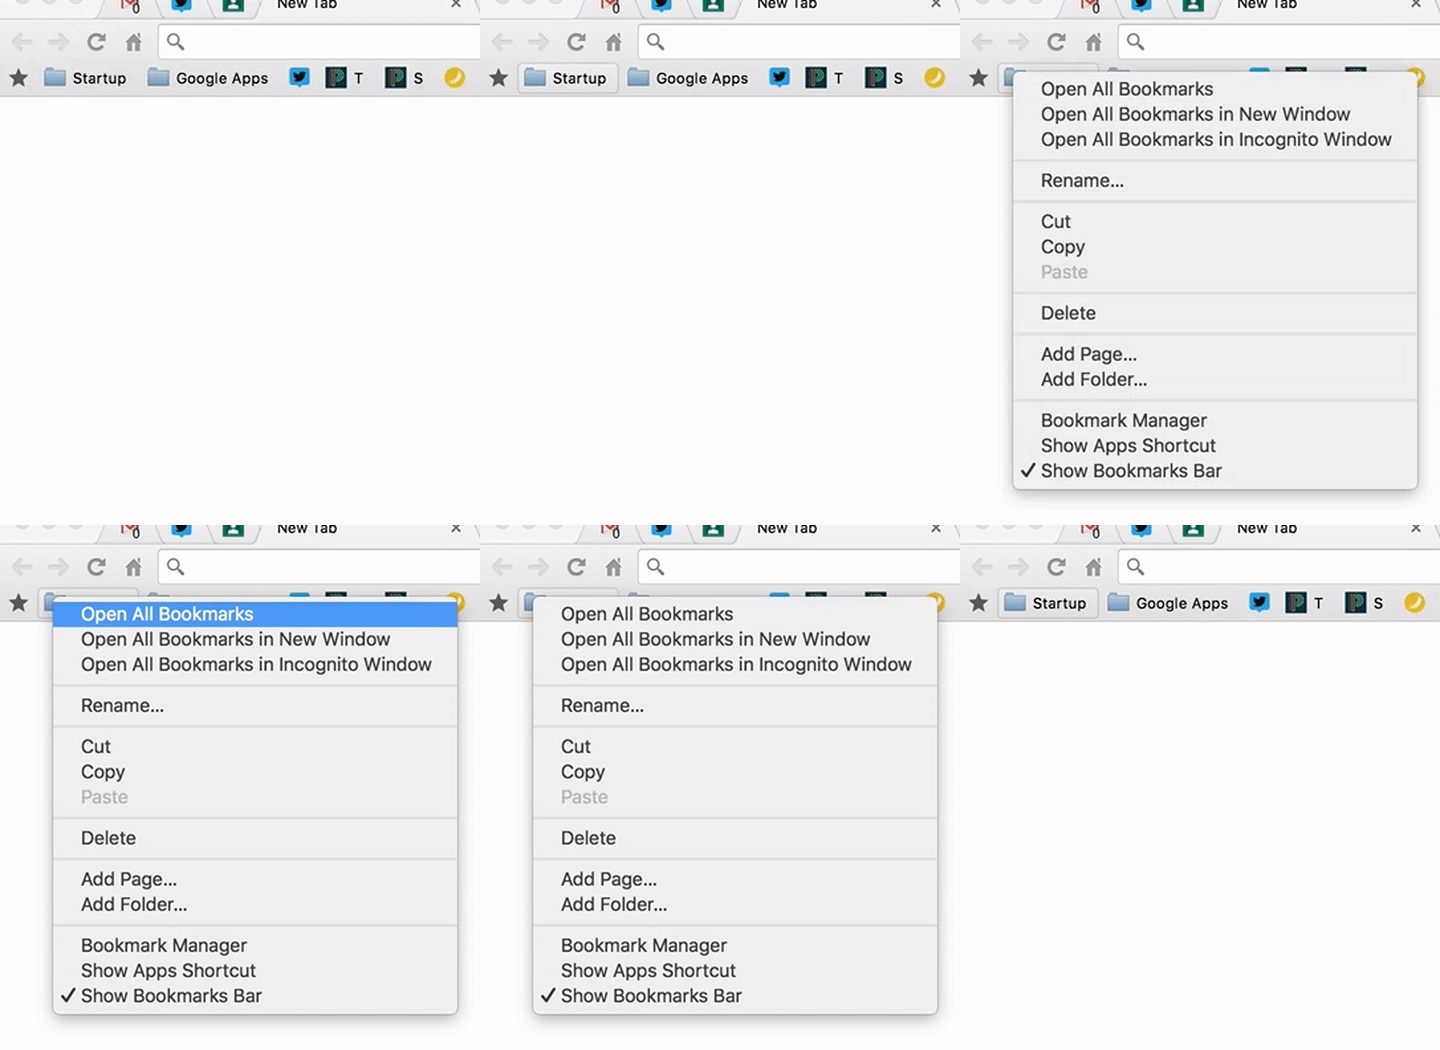
Signing on to multiple devices each day can be tiresome especially because I use the same 9 or 10 tabs everywhere I go. I've used TabCloud or Chrome's ability to open up tabs on startup but I have found them to be less reliable than a Bookmark Folder. If you right click a bookmark folder and choose "Open All Bookmarks," every bookmark in the folder will open up in your current window. This is a great way to pull up Gmail, Drive, Calendar, etc. quickly. Just put all of your popular sites in the folder and you are set to go!

Tuesday, April 19, 2016
5 Chrome Tips You Should Know
It seems like the number of things you can do in the Chrome browser are endless. But here are 5 that I use often and few people seem to know about.


Thursday, May 22, 2014
Adobe Acrobatic Pro: 3 of My Favorite Features
PDFs are a great way to distribute notes and answer keys to my students. PDFs also help because when you create a PDF it retains the form of the original document. This is essential as a math teacher because of the extensive use of MathType problems. Without PDFs those math equations may loose their form. While researching how to edit PDFs I noticed that with a copy of Adobe Acrobatic Pro you can edit PDFs but I had no idea how many other benefits a Pro account had. My classroom computer has a copy of the Pro version and a brief list of things I do with it is below.
1) Print as a PDF: I know that this is already an option from with Chrome (and it is free) but it is nice to open a Word document (or any program with print capabilities) and just choose "Print to PDF" to create a PDF version of my notes.

2) Convert Picture Files to PDF: From my time using Google Drive I have found that the most useful way to put answer keys for student access is as a PDF. I like to take photos of an answer key with my iPhone and then use them but they are a jpeg file. With Pro you can right click a picture file and "Convert to PDF" right from the desktop. Then I put that PDF in my Drive so my students can access it.

3) Combine Multiple Files Into One PDF: There have been many times that I have had several PDF files but wished I could combine them into just one PDF document. With Pro you can select multiple files (PDF, picture files, etc) and combine them into a single PDF. You can also choose specific pages from within them in case you want to leave a page out of the new version.

1) Print as a PDF: I know that this is already an option from with Chrome (and it is free) but it is nice to open a Word document (or any program with print capabilities) and just choose "Print to PDF" to create a PDF version of my notes.
2) Convert Picture Files to PDF: From my time using Google Drive I have found that the most useful way to put answer keys for student access is as a PDF. I like to take photos of an answer key with my iPhone and then use them but they are a jpeg file. With Pro you can right click a picture file and "Convert to PDF" right from the desktop. Then I put that PDF in my Drive so my students can access it.
3) Combine Multiple Files Into One PDF: There have been many times that I have had several PDF files but wished I could combine them into just one PDF document. With Pro you can select multiple files (PDF, picture files, etc) and combine them into a single PDF. You can also choose specific pages from within them in case you want to leave a page out of the new version.
Wednesday, May 14, 2014
Google Drive App for iPhone: Easiest Way to Display Student Work

1) Download, open and link the Google Drive app to your Google account. I use my personal iPhone because the iPad I have from my school is an iPad 2 whose camera is horrible.
2) While in the Google Drive app click the plus sign (+) in the top right corner.

3) In the menu it brings up, choose "Use Camera" at the bottom.

4) Take a picture of your students work and click "Use Photo." If you do not like the photo you can choose "Retake" instead.
5) After you take the photo the app will automatically upload the photo to your Google Drive account. It will put it in your main Drive folder. To see the progress of the upload, open the menu and click "Uploads." It usually takes about 30 seconds to upload the file.


6) In Chrome open the picture file in your Drive account and show the class their work. If you have a hard time finding the file (it usually names it "Photo Date Time") open your recent items and it should be at the top of your list.

Thursday, May 8, 2014
Wolfram Alpha: My Work Checker
One of my favorite tools on the web is Wolfram Alpha because it speeds up the double checking of my work in my classroom. There are so many ways to use it such as asking it to solve, simplify or graph functions. It gives a very accurate answer and with the Pro account it gives the step by step solutions. I have found two other ways to access Wolfram Alpha other than just going to their sites and it speeds up the checking of my work.
1) Set up a Shortcut in the Omnibox.
I have setup my own search short cut in the Omnibox of Chrome so that all I have to do to search Wolfram Alpha is type "w" and the press the space bar. After that I can input anything thing and Wolfram Alpha will do its best to answer.

2) Ask Siri.
If you open Siri on your iPhone and ask it to "Solve two x plus one equals five" it will search Wolfram Alpha's database and provide the answer. This works well with graphing and simplifying functions too.

1) Set up a Shortcut in the Omnibox.
I have setup my own search short cut in the Omnibox of Chrome so that all I have to do to search Wolfram Alpha is type "w" and the press the space bar. After that I can input anything thing and Wolfram Alpha will do its best to answer.
2) Ask Siri.
If you open Siri on your iPhone and ask it to "Solve two x plus one equals five" it will search Wolfram Alpha's database and provide the answer. This works well with graphing and simplifying functions too.
Monday, May 5, 2014
Searching Google Drive from Gmail

This is a nice feature that I never realized is part of Gmail. If you input something into the search bar of Gmail it will search for those keywords in your Google Drive as well. The search results for Drive are hidden after the 20 email results from the search. Not an earth shattering feature but can be a helpful time saver.
.png)

Wednesday, April 30, 2014
Google Drive Shared Folders: Making Annotated Notes Easy to Share
When I first started teaching one of the hardest things to do was to get students that were absent material, such as annotated notes from class, before coming back to class. With the use of Google Drive and sharing my folders I have a 3 step daily routine that keeps all of my classroom material up to date on my website. A must-have is to embed your class shared folder onto your website! It updates automatically when you add something to it.
1) Create a note sheet and save it as a pdf to my class shared folder.

2) While in class I use Smart Notebook or my iPad to annotate on the notes


3) Post the notes to my shared Drive folder.
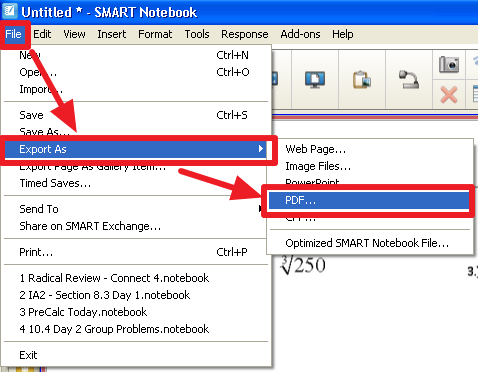

Now in my class folder I have a blank copy of the notes and an annotated copy. This has been such a time saver and it has allowed my students to not fall behind while not in class.

1) Create a note sheet and save it as a pdf to my class shared folder.
2) While in class I use Smart Notebook or my iPad to annotate on the notes
- Smart Notebook: I "print" my note sheet to Smart Notebook via the Smart Notebook Print Capture, and then annotate on the notes throughout class.
- iPad: For using my iPad in class I use the program Good Notes. Good Notes allows you to annotate over a pdf on your iPad. Good Notes also allows you to link your Google Drive account to it. I pull up the non-annotated pdf version of my notes from my Drive and project my iPad's screen through the projector in my room by using Reflector. This is extremely helpful because it lets me circulate the room while I annotate on the iPad and take pictures of student work as they complete problems.
3) Post the notes to my shared Drive folder.
- Smart Notebook: I then export the notes as a pdf. If you have Google Drive installed on the computer you can export this pdf straight to your class shared folder.
- iPad: The best part of Good Notes is that it will let you export your annotated notes right back to your Google Drive class folder.
Now in my class folder I have a blank copy of the notes and an annotated copy. This has been such a time saver and it has allowed my students to not fall behind while not in class.
Tuesday, April 29, 2014
QR Codes: An Integral Part of My Classroom
QR codes were introduced to me at the Midwest Google Summit this past November. Since then their integration in to my classroom has changed the way I have students access material in my Google Drive. I use the goo.gl shortener extension (link to chrome webstore) to create QR codes to different URLs I want my students to go to.

I wanted to share the THREE main ways I use QR codes in my class
1) QR Codes to My Flipped Classroom Google Forms.
For flipping my class, I supply my students with a guided note sheet to complete with the video. Before QR codes the students had to navigate to my website, but now they can scan the QR code on the notes and it will bring them right to the Google Form with the video and questions.

2) QR Codes to Answer Keys for Homework.
I like for my students to have access to the answer keys while they complete their homework to check their work. However many students did not want to take the time to navigate to my webpage to find the keys. Instead I create a QR code and put that on their homework so when they are done they can scan the code and check their answers right away.

3) QR Code For a Bell Ringer
As soon as the students walk in the door to my classroom I want them to be engaged so I have them fill out a Google Form several times a week to see what they thought of the homework. Instead of giving them a URL, I project a QR Code linked to a Google Form on the front board. They then scan the QR code and they have a few minutes to complete it while I check their homework. I find that this is a great time for me to check their homework instead of wasting time during class to do it. It also gives us a chance to look at the responses and discuss them as a class.
1) QR Codes to My Flipped Classroom Google Forms.
For flipping my class, I supply my students with a guided note sheet to complete with the video. Before QR codes the students had to navigate to my website, but now they can scan the QR code on the notes and it will bring them right to the Google Form with the video and questions.
2) QR Codes to Answer Keys for Homework.
I like for my students to have access to the answer keys while they complete their homework to check their work. However many students did not want to take the time to navigate to my webpage to find the keys. Instead I create a QR code and put that on their homework so when they are done they can scan the code and check their answers right away.
3) QR Code For a Bell Ringer
As soon as the students walk in the door to my classroom I want them to be engaged so I have them fill out a Google Form several times a week to see what they thought of the homework. Instead of giving them a URL, I project a QR Code linked to a Google Form on the front board. They then scan the QR code and they have a few minutes to complete it while I check their homework. I find that this is a great time for me to check their homework instead of wasting time during class to do it. It also gives us a chance to look at the responses and discuss them as a class.
Monday, April 28, 2014
Google Tasks: The Way I Stay Organized
Within a normal school day I feel like I have countless things to do and it is hard to keep them organized. I used to rely on post-it notes but soon my desk was overrun with yellow pieces of paper. Then came my discovery of Google Tasks. Google Tasks was a lab within Gmail that Google has made an official feature of Google Apps. To access your tasks, while in Gmail, click "Mail" in the top left hand corner and tasks will be one of the drop down options.


This will bring up a task list that will be part of your Gmail screen.
You can now add items that you need to complete in the future. You can also make multiple list to keep things more organized.
Here are a few benefits to using Google Tasks:
- When you complete a task, check the checkbox and it crosses the tasks off your list. Gives a feeling of accomplishment!
- Integrates with your Google Calendar - When you create a task, you can give it a date and that task will be added to your Google Calendar.
- View your tasks in Gmail AND Google Calendar.
- Add tasks on the go with an app. I use the free app GoTasks on my iPhone and any task I add is automatically added to my Google Tasks list. Including dates!!
Friday, April 25, 2014
Search Google Drive By File Type
Sometimes I find the need to look at every form I have created. Instead of going through all of my folders in my Drive there is an easier way to pull up a specific file type. Click the downward facing arrow in the search box while in your Drive and it will bring up a list of file types. Click the file type you want to search for and Drive will pull up every file that matches that criteria.


This is also helpful for searching for a file by specific file types by name.
Don't Forget to Install Google Drive Onto Your Computer
It took 6 months of using Google Drive for someone to tell me that you can install the application onto your PC or Mac for quicker access to your Drive folders. Installing the Google Drive application actually puts Drive into your list of drives as if it is one of your network drives.

Here are some of the benefits of using this as a way to manage your Drive files:
- You can share files right from the finder window by right clicking a file
- You can save a file directly to drive from a program (such as Word)
- If you open a Word document from your Drive window, edit it and then save it the file will be automatically updated in your Google Drive. It will also keep a record of revisions to that document if you right click the file from WEB version of Drive.
- Export annotated notes from Smart Notebook as a pdf straight to Drive for students
Wednesday, April 23, 2014
The Untapped Potential of Web Clipboard in Google Drive
Copy and paste is a necessity in creating resources for teaching. After using copy and paste within Google Drive some things did not paste correctly (especially pasting Google Drawings into a Google Document).


Web Clipboard however is a great tool within Google Drive applications where you can copy an item to a "web clipboard" and access that clipboard from any Google Drive application. Look at the result of copying the same "entire drawing" to the web clipboard and pasting it into a Google Document.
The drawing retains it all of its original traits and is a resizable image. There are other advantages to using the Web Clipboard as well. The Web Clipboard will hold up to 10 items for 30 days. That means you can access the same items from the same place without having to copy the item multiple times. The Web Clipboard is located under the "Edit" menu in every Google Application.
Monday, April 21, 2014
Tab Switching on Touchpad For Chromebooks
(Chromebook) While studying for the Google Educator test I learned a quick way to switch between tabs using the touchpad on a chromebook.

Place 3 FINGERS on the touchpad and swipe left or right. That will highlight the tab you would like to switch to without clicking. A huge time saver for myself.
Place 3 FINGERS on the touchpad and swipe left or right. That will highlight the tab you would like to switch to without clicking. A huge time saver for myself.
Thursday, April 17, 2014
Saving Files in Multiple Locations in Google Drive
Trying to locate a file in Google Drive can be frustrating if the location of the file is under several subfolders. Moving the file to a more accessible location would make finding it easier but maybe you would like it to also remain in its current location (maybe it is in a shared folder and you do not want it to loose it's shared properties). Well I just found this out.
You can move a file in Google Drive so it appears in multiple locations. When you select "Move to" hold down Control (⌘ on Macs) and click the second (or third or fourth) location you would like for the file to appear.

You can move a file in Google Drive so it appears in multiple locations. When you select "Move to" hold down Control (⌘ on Macs) and click the second (or third or fourth) location you would like for the file to appear.
When you edit the file in one location it it also edited in all of the locations of the file.
Tuesday, April 8, 2014
Splitscreen Windows
When I work within Chrome or Word I find it helpful to have two windows open at once but I always have to resize them so that I can view or edit both windows. To save some time Windows 7 has a feature built in called "Snapping" a window. Just drag the window to the left or right edge of the screen and it will create a quick outline of the window. Let go of the mouse button and it will snap it to that side. To maximize your window drag it to the top-middle of the screen.
(UPDATE 5/15: Pressing Windows Key + Left arrow will also snap the window to the left. This also applies to the right arrow to snap right and up arrow to maximize.)


(UPDATE 5/15: Pressing Windows Key + Left arrow will also snap the window to the left. This also applies to the right arrow to snap right and up arrow to maximize.)
I find this feature to be one of the most valuable time savers during my day. Unfortunately it feels like I have to use multiple different operating systems each day so I put together other ways to use this snapping feature on each system.
Chromebook: There is no way to drag the windows to snap the windows but there is a keyboard shortcut to get the windows to split screen. Alt + [ will snap the window towards the left of the screen and Alt + ] will snap the window towards the right. You can also hit [ or ] multiple times to make the window smaller.
(UPDATE 4/12: Chrome OS 34 now lets you snap the window like Windows 7!! Just pull the windows to the left or right of the screen to get them to snap to the corresponding side. Awesome feature.) (UPDATE 5/15: Alt +] also snaps the window to the right.)
Mac OS: There is a free program called Better Touch Tool (Download) which gives you all of the functionality of the snapping feature of Windows 7 but it also allows you to setup keyboard shortcut (I created a snapping short cut: Shift + Left Arrow for left snap and Shift + Right Arrow for right snap) as well as custom gesture shortcuts. There are so many possibilities with the use of Better Touch Tool. I highly suggest you check it out.
Windows XP: Our office computers are still running XP and I find myself trying to snap windows but it does not work. I found Aero Snap (Download) which is free and quick to install. It is a beta program but I have not found any problems with it. You can snap your windows left, right and maximize just like in Windows 7.
Friday, April 4, 2014
Screenshots Made Easy
For years I have relied on the most often used way to take a screen shot (ctrl + Print Scrn) and it is also the most frustrating method. Ctrl+PrtScrn forces me to take a screen shot of the entire desktop but a majority of the time I want just a small region of the screen. And to edit that screenshot I would have to paste it into Paint and edit it. You know the story. I have found three other ways to take screenshots that you might find yourself using from now on. All three are FREE, easy to use, may already be on your computer and will save you so much time.
1)  (Windows 7 or later) The snipping tool is a free program already installed on the computer. Go to the start menu and search or find the program "Snipping Tool." This will give you the ability to screenshot a region of the screen instead of having to take a screenshot of the entire desktop. You can then save or copy the screenshot for use in other programs.
2) (Windows XP, 7 or later) PicPick was at first an alternate to print screen for computers that I use running Windows XP because XP does not have the Snipping Tool installed. However it has turned out to be my go to screenshot tool on Windows 7 computers as well. The main reason is that you can set up a keyboard shortcut for taking a screenshot. Under the options menu you can create a hot key (mine is ctrl+shift+z) to bring up the screenshot crosshairs. Another benefit to PicPick is that is also automatically opens your screenshot in its own version of Paint for you to edit it. Their program has many other options available that Paint does not such as pixilation.
3) (Mac OS) Skitch is my alternative to PicPick for the Mac. It does not have as many options as PicPick but it does have a keyboard shortcut for taking a screenshot (⌘+Shift+5) It also opens the screenshot in its own program that you can edit it from.
(Windows 7 or later) The snipping tool is a free program already installed on the computer. Go to the start menu and search or find the program "Snipping Tool." This will give you the ability to screenshot a region of the screen instead of having to take a screenshot of the entire desktop. You can then save or copy the screenshot for use in other programs.2)
(Windows XP, 7 or later) PicPick was at first an alternate to print screen for computers that I use running Windows XP because XP does not have the Snipping Tool installed. However it has turned out to be my go to screenshot tool on Windows 7 computers as well. The main reason is that you can set up a keyboard shortcut for taking a screenshot. Under the options menu you can create a hot key (mine is ctrl+shift+z) to bring up the screenshot crosshairs. Another benefit to PicPick is that is also automatically opens your screenshot in its own version of Paint for you to edit it. Their program has many other options available that Paint does not such as pixilation.3)
(Mac OS) Skitch is my alternative to PicPick for the Mac. It does not have as many options as PicPick but it does have a keyboard shortcut for taking a screenshot (⌘+Shift+5) It also opens the screenshot in its own program that you can edit it from.Friday, March 21, 2014
Consolidate Your Bookmarks

If you are anything like me your bookmarks bar in chrome can fill up very fast. But then, at a Google conference, one of the presenters showed how to make your bookmarks ICONS instead of an "icon and name." This works great for bookmarks that have their own distinct icon like Gmail, Drive and PowerTeacher.

Here is the short version: Right click a bookmark, choose "edit" and delete the name. Click "save" and you are done. For bookmarks that have the same icon attach a letter in the name for the bookmark. For example, for PowerTeacher I have the icon and the letter "T" for my bookmark and for PowerSchool I have the icon and the letter "S." Great way to save space and to have access to many more bookmarks than I had before.
Subscribe to:
Posts (Atom)